Integrate Swift Library into Objective-C Project

Since swift was released on 2014, we’ll found out few awesome libraries writing in Swift in github. Here is a problem I’ve met recently, I have learned how to import Objective-C libraries into a Swift project, and what if I want to import a new Swift library into an old Objective-C project.

This is very interesting as we has been maintaining our old project for a while which might be difficult to rewrite all of them into Swift code. I found the solution through StackOverflow(here) and it is quite trivial.

The most important thing is you have to make sure your Build Settings is set as below:

  • Product Module Name : myProject
  • Defines Module : YES
  • Embedded Content Contains Swift : YES
  • Install Objective-C Compatibility Header : YES
  • Objective-C Bridging Header : Others Resources/(My Project Name)-Bridging-Header.h
And then, import the swift libraries into your Objective-C code like this:
#import "myProject-Swift.h"

This action will import all swift modules, as in Swift, everything is an object in universal world. Very simple and clean.

Swift notes – Google Drive API Library integration for iOS

iOS integrate with Google Drive API

Recently I am planning to integrate the Google Drive function into my app.  Meanwhile, I have to include the Google API library into my project, however I feel the documentation and the tutorial I found was not perfect enough and also, I find out another clean method to integrate the API Library together with my current project.

It is quite easy while you search the keyword “Google Drive API iOS” by google, it will highly recommend you to go to this https://developers.google.com/drive/ios/quickstart

Well, you might notice it is quite tedious doing the following steps:

Step 1: Enable Drive API
Just follow the instructions to register and what we’ll need it later is Client ID and Client Secret.

Step 2: Download Google API
It is a must to download via SVN, as the data via manual download from github is not completed.

Step 3Create and configure an XCode project
This is the WORST part I feel it is very tricky and the documentation here is not very clear enough. Mostly people will have problem right here! Another thing I want to complain that the tutorial video is really WASTING YOUR TIME as the result come out was failed, and the speaker just opened another project to show you the result.

So I will suggest another solution at this part, which I feel clean and you don’t have to worry where to put your google-api folder and files.

From step 2, running the svn command:

svn checkout http://google-api-objectivec-client.googlecode.com/svn/trunk/ google-api-objectivec-client-read-only

you will have the folder google-api-objectivec-client-read-onlygoogle drive library folder

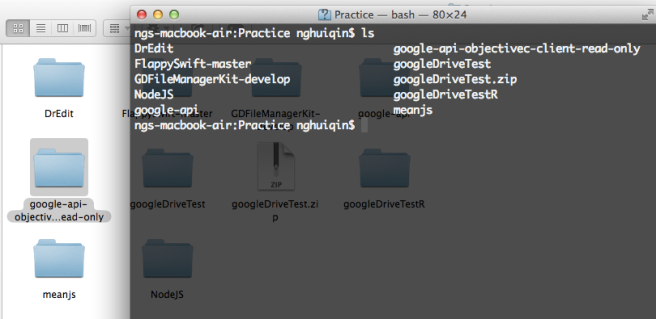
Go to google-api-objectivec-client-read-only/Source  Run the GTL.xcodeproj GTL xcode project

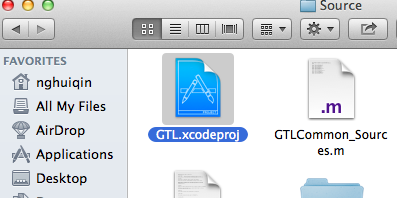
Build the project by running CMD+B
Build GTL project

Then open your own project, here is an advice to create a folder(group) in the project GTL group

Remember to link the path
Screen Shot 2015-04-09 at 2.10.10 PM

Go back to your GTL project, expand the folders under GTL Source/Common except a folder Mac

Here is the magic

Select from Common folder to the bottom, and drag to your project’s GTL folder.
drag file magic

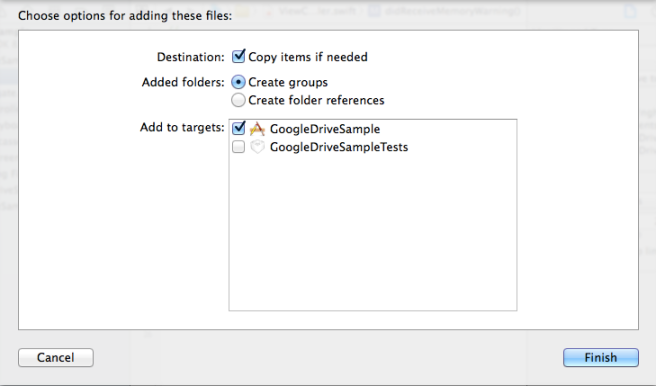
Remember to tick copy items
copy items

Select your project, go to Build Phases -> Compile Sources and select all the files with prefix GTL and GTM
build phase compile sources

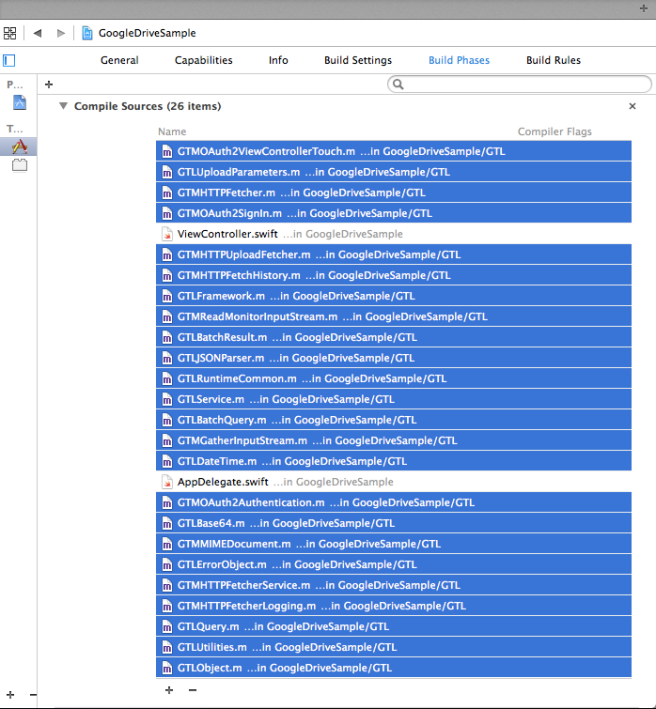
Press enter and there will have a dialog box prompt out, key in -fno-objc-arc and press enter again to add compiler flags.
flag no objective c arc

Use same method to create another group for Google Drive
Go back to your google-api-objectivec-client-read-only downloaded from SVN
Under google-api-objectivec-client-read-only/Source/Services/Drive/Generated

select all files except GTLDrive_Sources.m drag and copy to your project
copy google drive files

Well almost done! All You have to do now is adding the necessary framework into your project.

Security.framework
SystemConfiguration.framework
add framework

Ta-Da, the google drive library is set. You can build the project now if it doesn’t prompt any issue, then the library is successfully integrated!!

The rest, let’s run the example code to see whether it’s work!

For Swift project, remember to build your bridge header file, and import following files

#import "GTMOAuth2ViewControllerTouch.h"
#import "GTLDrive.h"

In order not to make my post longer, I have put the sample code in github, please download from here.

Test Driven Development(TDD) practice with Objective-C

I joined the event held by WWCKL on 11th March 2015, talking about Test Driven Development.
The meetup event’s link is here : link

WWCKLHere I will go through how I implement Unit Test in Objective-C using Xcode, possibly, I will do for Swift language after that. Hopefully it will be helpful to someone who may see this, though it is not very popular language in Malaysia. I was testing it in NodeJS at the very beginning, but there is someone posted his excellent work in Github.

Don’t worry, I put my Objective-C version in Github too, you can either download from there or read the details as below.

First, open a single view application.
new project

And then add a model in your project (MVC Model-View-Controller structure)

addCalculatorObject

Here is my code:
Calculator.h

#import <Foundation/Foundation.h>

@interface Calculator : NSObject

- (int)addWithString:(NSString *)string;

@end

Calculator.m

#import "Calculator.h"

@implementation Calculator

- (int)addWithString:(NSString *)string
{
    int result = 0;
    
    // Handling delimiters
    if (string.length > 2) {
        if ([[string substringWithRange: NSMakeRange(0, 2)] isEqualToString:@"//"])
        {
            // Remove @"//"
            string = [string substringFromIndex:2];
            NSLog(@"remove //: %@", string);
            
            // Get delimeter string
            NSArray *tempArray = [string componentsSeparatedByString:@"\n"];
            NSString *delimeterString = [tempArray objectAtIndex:0];
            NSLog(@"delimeterString: %@", delimeterString);
            
            // Remove first \n to get the numbers string
            NSString *newString = [tempArray objectAtIndex:1];
            for (int i = 2; i < tempArray.count; i++) {
                 newString = [NSString stringWithFormat:@"%@,%@", newString, [tempArray objectAtIndex:i]];
             }
             NSLog(@"numberString: %@", newString);
             string = newString;

             NSArray *delimeters = [delimeterString componentsSeparatedByString:@"["];
             for (NSString *delimeter in delimeters) {
                 // Skip first object
                 if ([delimeter isEqualToString:@""]) {
                     continue;
                 } else {
                     // Remove ] behind delimeter
                     NSString *cleanDelimeter = [delimeter stringByReplacingOccurrencesOfString:@"]" withString:@""];
                     NSLog(@"delimeter: %@", cleanDelimeter);
                     // Replace , instead of the delimeter
                     if (cleanDelimeter.length > 0) {
                        string = [string stringByReplacingOccurrencesOfString:cleanDelimeter withString:@","];
                    }
                }
            }
            
        }
    }


    // Replace @"\n"(newline) with @","(comma)
    string = [string stringByReplacingOccurrencesOfString:@"\n"
                                               withString:@","];
    NSLog(@"final string: %@", string);
    
    // Split the numbers into array
    NSArray *numbers = [string componentsSeparatedByString:@","];
    
    // Sum up the numbers
    for (NSString *number in numbers) {
        result += number.intValue;
    }
    
    return result;
}

@end

After that, you create testcase for calculator
chooseTestCaseClass

addCalculatorTestCase

Insert the following test case you wanted:

#pragma mark - Test Calculator Add Functions
- (void)testCalculatorWithEmptyString {
  Calculator *calculator = [[Calculator alloc] init];
  int result = [calculator addWithString:@""];
  XCTAssertEqual(result, 0, @"Should have matched");
}

- (void)testCalculatorWithSingleNumber {
  Calculator *calculator = [[Calculator alloc] init];
  int result = [calculator addWithString:@"1"];
  XCTAssertEqual(result, 1, @"Should have matched");
}

- (void)testCalculatorWithNumbers {
  Calculator *calculator = [[Calculator alloc] init];
  int result = [calculator addWithString:@"1,2,3,4,5"];
  XCTAssertEqual(result, 15, @"Should have matched");
}

- (void)testCalculatorWithNewLineAndNumbers {
  Calculator *calculator = [[Calculator alloc] init];
  int result = [calculator addWithString:@"1,2\n3"];
  XCTAssertEqual(result, 6, @"Should have matched");
}

- (void)testCalculaterWithSingleDelimeter {
  Calculator *calculator = [[Calculator alloc] init];
  int result = [calculator addWithString:@"//[::]\n1::2,3\n4::5"];
  XCTAssertEqual(result, 15, @"Should have matched");
}

- (void)testCalculaterWithMultipleDelimeters {
  Calculator *calculator = [[Calculator alloc] init];
  int result = [calculator addWithString:@"//[***][&][@]\n1***2&3&4***5@6@7,8\n9,10"];
  XCTAssertEqual(result, 55, @"Should have matched");
}

Run your test!
You can choose the certain testcase to run by clicking the arrow button beside:
beforeRunTest

The simulator will be prompt while testing, nevermind, you will still get your result.
afterRunTest

You can also refer to the console log for details
testingConsoleLog

Swift notes – Core Data’s crashes, MEMORY_BAD_ACCESS

After using Swift, I almost forget about Obj-C while writing code. However, while I using Core Data I have to add

@objc(<EntityName>)

to convert Swift into Objective-C then Core data can successfully compiled in the project! (Okay, this is awkward ~.~)
Recently, I always get crashes at one attribute in Core Data, and I have no idea why it crashed at the moment due to the message prompt by compiler wasn’t obviously state the problem, just know it maybe a memory management issue.

After exploring the reason, I gave up on Swift and decided to change the NSManagedObject subclass into Objective-C. Ta-da, the compiler shows me this error : Cocoa naming convention for returning ‘copy_direction’ objects

And I finally found out the problem is naming convention issue due to Swift accept this naming but Objective-C not. Therefore, the conclusion is to follow the naming convention rule of Objective-C in Core Data. Or else, your attribute will be deleted in memory and cause the crash happen to you app.

According to the answer from stackoverflow, due to memory management policy,

You take ownership of an object if you create it using a method whose name begins with “alloc”, “new”, “copy”, or “mutableCopy”.

Luckily, it isn’t troubling me very long but I feel really stupid of myself to have such awkward bug in my app and no clue what did I do wrong.

Swift notes – Closure instead of protocol delegate in Obj-C

Sometimes we’ll need to pass data between two ViewController. For those child ViewController in Obj-C, we usually need to create a protocol for delegate in order to get the data after we close the child controller.

In Obj-C, how we passing data back from child to parent : (refer to Passing Data Between Controller)

Passing Data Back to the Previous View Controller

To pass data back to the previous view controller, you will need to create a delegate protocol the second view controller uses and exposes to the previous view controller. The sample delegate shown in this example forces implementation of the dataFromController: method by the adopter. The second view controller exposes the delegate protocol through the delegate property.

@protocol SecondViewControllerDelegate <NSObject>
@required
- (void)dataFromController:(NSString *)data;
@end

@interface SecondViewController : UIViewController
@property (nonatomic, retain) NSString *data;
@property (nonatomic, weak) id<SecondViewControllerDelegate> delegate;
@end

On the first view controller we need to adopt this delegate protocol.

@interface FirstViewController () <SecondViewControllerDelegate>
{
    UILabel *_label;
    UIButton *_button;
}
@end

Now that the delegate protocol is adopted, we must implement the required methods. In this method, our sample sets the label text to the data passed in and disables the button.

- (void)dataFromController:(NSString *)data
{
    _label.text = data;
    _button.enabled = NO;
}

For this method and adoption of the delegate protocol to work, we must set the delegate property to self.

- (void)passDataForward
{
    SecondViewController *secondViewController = [[SecondViewController alloc] init];
    secondViewController.data = _label.text;
    secondViewController.delegate = self; // Set the second view controller's delegate to self
    [self.navigationController pushViewController:secondViewController animated:YES];
}

My comment to Obj-C passing back data is “A LOT of Things To Do…”

Let’s see how Swift simplify this problem

 This sample refers to this blog
import UIKit

class ViewController: UITableViewController {
    override func prepareForSegue(segue: UIStoryboardSegue,
        sender: AnyObject!) {
        let nav = segue.destinationViewController as UINavigationController
        let add = nav.topViewController as AddViewController

        // finish closure
        add.didFinish = { cont, name in
            // hide add scene
            self.dismissViewControllerAnimated(true, completion: nil)

            // push the new `Item` onto the data source
            self.items.insert(Item(name: name), atIndex: 0)

            // display the new `Item` at the top of `self.tableView`
            let indexPath = NSIndexPath(forRow: 0, inSection: 0)
            self.tableView.insertRowsAtIndexPaths([indexPath], withRowAnimation: .Fade)
        }

        // cancel closure
        add.didCancel = { cont in
            self.dismissViewControllerAnimated(true, completion: nil)
        }
    }
}

Look how the child view controller easy setup this delegate protocol:

import UIKit

// add scene view controller
class AddViewController: UITableViewController {
    // "cancel" and "finish" delegate types
    typealias CancelDelegate = (AddViewController) -> ()
        typealias FinishDelegate = (AddViewController, data: String) -> ()

        var didCancel: CancelDelegate?
        var didFinish: FinishDelegate?

    // outlets and actions

    @IBOutlet var nameTextField: UITextField?

    // "Cancel" `UIBarButtonItem` action
    @IBAction func cancel(sender: AnyObject) {
        // hide keyboard
        self.nameTextField!.resignFirstResponder()

        // notify "cancel" delegate
        self.didCancel!(self)
    }

    // "Done" `UIBarButtonItem` action
    @IBAction func done(sender: AnyObject) {
        // hide keyboard
        self.nameTextField!.resignFirstResponder()

        // notify "finish" delegate
        self.didFinish!(self, data: self.nameTextField!.text)
    }
}

Swift notes – Alamofire

When using Swift programming language to create an app, I found that it’s a lot different comparing with Objective-C, even they’re using same library and framework.

Creating an service app which is usually integrated with API server, therefore, we’ll need to send HTTP RESTful functions to API server. In Objective-C, we’ll use AFNetworking as the tool. The creator of AFNetworking also wrote another one in Swift which is in more elegant way in my opinion – Alamofire. (For further info, please refer to the link)

What I want to note down here is how to import this library in Swift project without using cocoapod. (My personal preference is statically importing library into project, I don’t like hidden reference or link, feeling suck when dealing with unknown bugs)

Easy few steps:

  1. Download the Alamofire from github.
  2. Copy Alamofire.swift file and put into your project.
  3. Add struct on the top of the file: (refer line 25 – 27 of the image below)

After adding the struct, you can start calling the function. What I love in Swift is class concept, you don’t have to import the module you needed like what we did in Objective-C. Let’s see the sample how I call the function.

Alamofire.manager.request(.GET, "http://yourlink.com", parameters: ["String" : "AnyObject", "String2": "AnyObject"], encoding: .JSON .responseJSON({ (request, response, data, error) -> Void in
                println(response)
                println(data)
                println(error)
               })

It is pretty easy and you can figure it out yourself about how Alamofire works as the code is showed there. Another thing we’ve to be reminded is Swift is only support iOS 7.0 + meanwhile if you’re creating an app for iOS 6.0 + please use Objective-C.

While using Alamofire, I was wondering how to customize the headers of HTTP request, the latest answer was

Alamofire.manager.session.configuration.HTTPAdditionalHeaders = ["Your Customize": "Your data"];

However, this solution is only working on iOS 8.0+, I found another answer in StackOverflow which declare is working on iOS7.0+, but it is still pending to test.

how to use Alamofire with custom headers